 in the lower toolbar. This displays the dialog shown below (note that all of the controls in the main window remain active while this dialog is open).
 ( only).
Starting with version 8.5, VinylStudio can apply FFT (Fourier transform)-based equalisation curves / filters to your recordings. All filters are applied in real time - What you Hear is What you Get - and no changes are made to your original recordings. Instead, VinylStudio applies filtering 'on the fly' as and when needed (when burning a CD, for example). Filtering can be applied to an entire LP side, to individual tracks or even specific sections of music within a track. You can also apply more than one Equalisation Curve / Filter at a time.
An implementation detail that might be of interest is that FFT-based filtering and hiss filtering are carried out by the same piece of code, thus halving CPU-time requirements (and FFT-induced artefacts) when both features are enabled at the same time. It also doesn't matter how many curves you define. VinylStudio does them all together and applies them just once.
To apply or adjust equalisation curves / filters for the currently selected album side, click on the Equalisation curves button in the lower toolbar. This displays the dialog shown below (note that all of the controls in the main window remain active while this dialog is open).
Please note that the effect of any filters being applied is not shown in the waveform display. If you want to see what your audio looks like after filtering, you can save a copy of your recording from the File History List.
To apply just one filter, click on the 'On' button or select a preset: from the dropdown list:
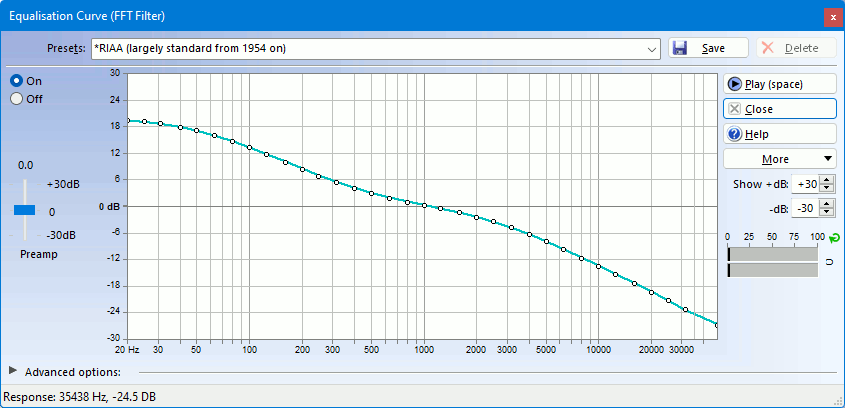
To edit the curve, click and drag any 'node' (circle), click outside any node to insert a new one, or drag a node out of the window to delete it. If you make a mistake, use Undo () or Redo ). See also under the 'More' button for additional options.
You can constrain dragging to the vertical axis by holding down the Shift key, or to the horizontal axis by holding down the Control key.
You can save your work as a preset at any time by clicking 'Save Preset', but VinylStudio will apply your changes to the current recording (and remember what they are) whether you do that or not.
VinylStudio can apply several filters to the same recording, the result being the cumulative effect of all the filters specified. To do this, click on Advanced options and then on the Add Filter button to add a new filter. This displays the following dialog:
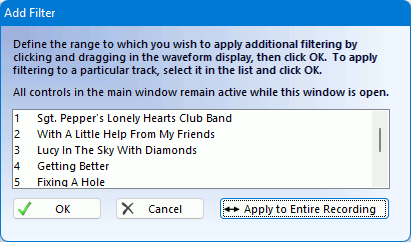
Unless you only want to apply filtering to (say) a particular track, click 'Apply to Entire Recording'. The result should look something like this:
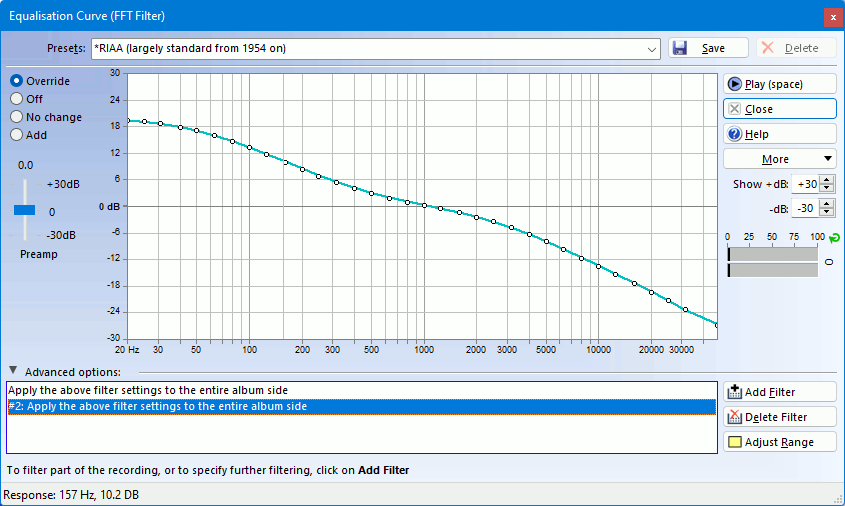
You will notice that a second entry has appeared in the list (#2), representing the newly added filter. You can then edit the curve or select a preset as above and the result will be added to the first filter you defined (unless you turn it off in which case it has no effect at all). There is no limit to the number of filters you can add in this way, although it is uncommon to define more than a couple.
VinylStudio can apply a filter to any section of music within an LP side. You might want to boost the bass on a particular track, for example. To do something like this, click on Advanced options and then on the Add Filter button to add a new set of filters. This displays the same dialog as previously, but you use it differently:
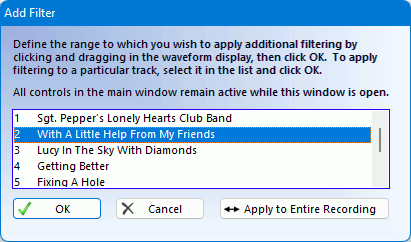
While this dialog is open, you can either define a selection by clicking and dragging in the waveform display or you can select a track from the list and click Select Track. Either way, the new filter will be applied to the range you specify.
After you close the Add Filter dialog, the screen should look something like this:
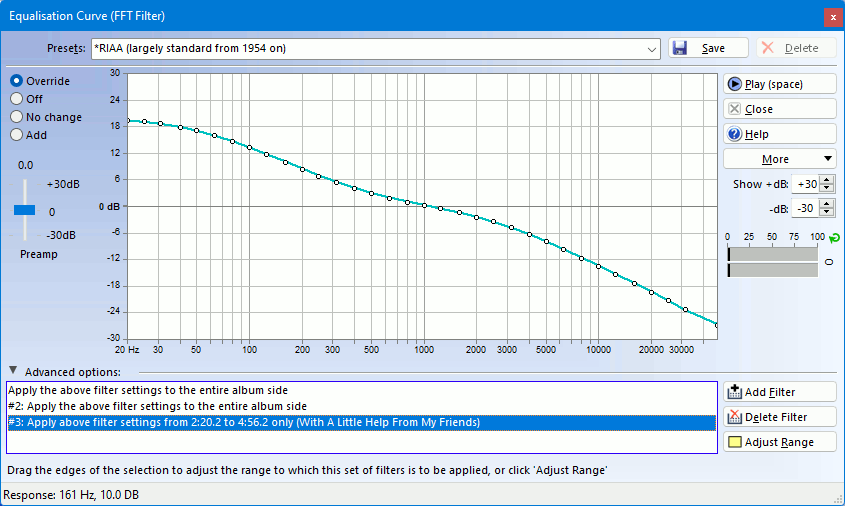
This time, the newly added entry (#3) only applies to the section of music you selected and there are more radio buttons to choose from. These buttons allow precise control over how the filter is applied as follows:
You can add as many filters as you like in this way and for each one you can say whether you want to turn it on, turn everything off, keep the existing settings (i.e. 'unchanged from the above') or add to the existing filters. This provides a lot of flexibility - more than you need probably - but it does let you say things like 'boost the treble on the entire recording except for tracks X, Y and Z'.
If your phono preamp has a 'flat' switch, if you are recording discs cut before 1954, or if you recorded with speed conversion enabled, you can apply recording equalisation to correct the tonal balance of your recording. If you simply want to apply RIAA equalisation, use the RIAA preset. For anything more complex, select 'Apply Recording Equalisation' under the 'More' button, which will display the following dialog:
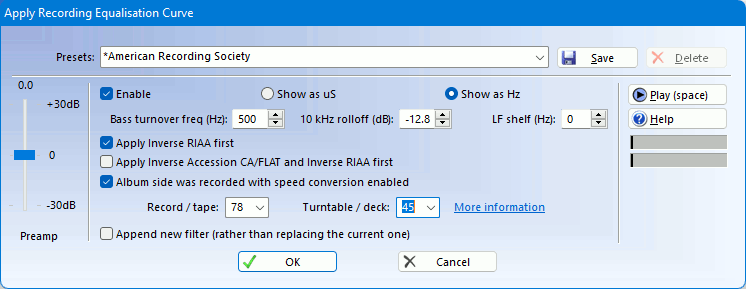
For discs cut from 1954 onwards, the RIAA preset should generally be used. For earlier discs, VinylStudio comes with a large number of preset curves but selecting the right one can be a challenge. Try consulting the sleeve notes or plug in a decent set of headphones and adjust the parameters by ear. Increasing the bass turnover frequency will boost bass notes. Increasing the 10kHz rolloff value will cut treble. You can save your settings as a preset, and you can also enter time constant values if that is the information you have. Either way VinylStudio will remember your settings and apply the correct curve to the recording.
When using recording equalisation, use the 'flat' switch on your phono preamp if it has one. If it doesn't, check the 'Apply inverse RIAA first' box. If you recorded with speed conversion enabled, it is important to tell VinylStudio so that it calculates the correct inverse curve. VinylStudio will generally remember this for you but older versions of VinylStudio didn't so you will need to set it here.
If you are recording via a Graham Slee Accession preamp set to CA/FLAT, the procedure is slightly different. If you are recording a disc that uses standard RIAA equalisation, just select 'Inverse Accession CA/FLAT' from the dropdown. If, on the other hand, you are recording an older disc that requires a different equalisation curve, select that from the dropdown instead and check the 'Apply Inverse Accession CA/FLAT and Inverse RIAA first' box.
Once you quit this dialog, VinylStudio will add a (possibly composite) curve to your recording, and it is this that does the actual work:
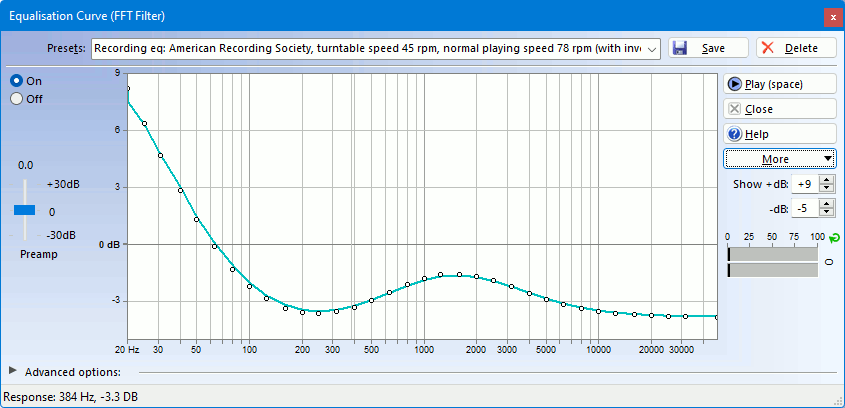
Please note that you can also apply recording equalisation at record time, which can improve the dynamic range of your recordings if recording at 16 bits per sample and also has the advantage that the waveform display shows the correctly equalised signal. This is our recommendation.
The equalisation curves built into VinylStudio were taken from the Audacity wiki, http://wiki.audacityteam.org/wiki/78rpm_playback_curves and references therein, with much thanks. You can also enter the parameters yourself for certain curves by looking them up at Vinyl Engine: www.vinylengine.com/cartridge_database_record_equalization.php.
The Inverse Accession CA/FLAT curve is supplied courtesy of Graham Slee, see:
www.alpinesoft.co.uk/VinylStudio/accession_ca_flat.aspx.
You can import and export curves from / to a file that Audacity 2.x can understand by selecting Import / Export Audacity Curves from the menu under the More button. This can also be used to move equalisation curves / filters between machines (including Macs and PCs).