 in the lower toolbar. This displays the Filter Settings dialog shown below. All of the controls in the main window remain active while this dialog is open.
 VinylStudio has a complete set of filters to help you cleanup your recordings and to adjust the tonal balance. You can filter out hum, hiss (and other forms of noise) and rumble, and there is also a graphic equaliser with a normalisation facility. Filtering can be applied to an entire LP side, to individual tracks or even specific sections of music within a track.
You will hear the effects of your filters immediately while working in VinylStudio, but no changes are made to your original recordings. Instead, VinylStudio applies filtering 'on the fly' as and when needed - i.e. when you save your tracks, when you burn a CD or DVD, or when you save a copy of your original recording with corrections enabled.
Please note that the effect of any filters being applied is not shown in the waveform display. If you want to see what your audio looks like after filtering, you can save a copy of your recording from the File History List.
To apply or adjust the filters for the currently selected album side, click on the Filters button in the lower toolbar. This displays the Filter Settings dialog shown below. All of the controls in the main window remain active while this dialog is open.
Filtering is normally applied to an entire album side at a time, so we will cover that first. To adjust the Hum filter, click on the Hum Filter tab:
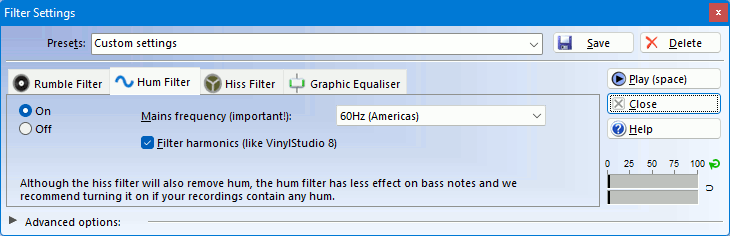
For the hum filter, the only thing you need to specify, other than whether to turn it on or not, is the mains frequency in your houeshold (or, to be precise, the mains frequency in the household where the recording was made); this is 50Hz in the UK, Europe, Australia and China, and 60Hz in the Americas (in Japan it varies by region). Recordings made from vinyl often contain a certain amount of hum, so if yours are affected in this way try turning this on while listening to a quiet passage on headphones. If hum filtering seems to inefeective, try changing the mains frequency.
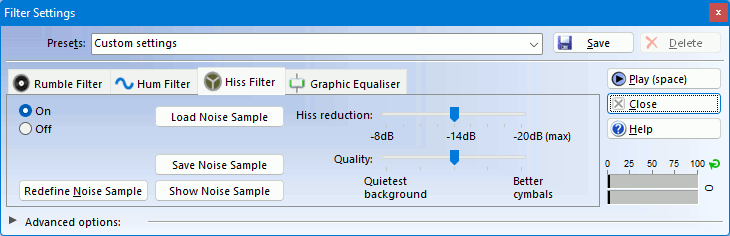
The hiss filter is useful both for tapes and for other recordings with a high level of background noise such as 78's or badly worn vinyl recordings. We do not recommend applying it to vinyl recordings in good condition however as it is a subtractive process and can introduce a certain amount of distortion. But feel free to experiment - you can always turn it off again.
For the hiss filter to function properly, VinylStudio needs you to define a Noise sample - a short section of the recording (1 second or so) containing background noise (NOT complete silence) and nothing else. You will be prompted to do this the first time you turn the hiss filter on, and you do so by selecting a suitable section (by clicking and dragging in the waveform display). If you get this wrong, the results can either (a) sound very strange or (b) not be filtered at all so if you think this has happened to you, click on Redefine Noise Sample and try again.
You can also load a noise sample from a previously saved file. This is useful if you have a recording where there is no place to define a noise sample in the normal way. Use this feature with care - inaccurate noise samples give poor results. You can also view a spectral analysis of the currently defined noise sample via Show Noise Sample.
The two sliders determine how much filtering is applied; we suggest you experiment with these while listening to a quiet passage on headphones. Don't be tempted to remove every last trace of hiss as this can make things sound rather artifical.
Hiss filtering works best after you have declicked your recording.
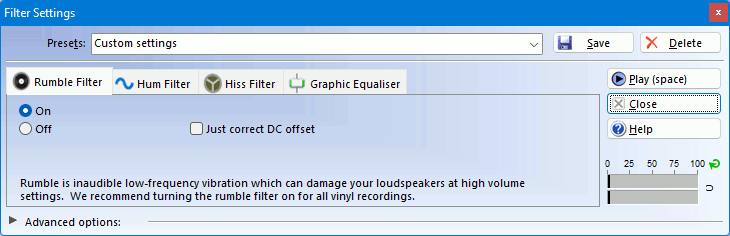
The rumble filter is a simple on / off affair. Turn it on to filter out potentially damaging low frequency noise often present on vinyl recordings (especially in the leadin) or introduced by turntable bearings. High levels of rumble can sometimes cause a faint click at the beginning and end of tracks and can also cause the hiss filter to introduce faint clicking sounds into the music. Turning the rumble filter on will eliminate this. The rumble filter also performs DC-offset correction.
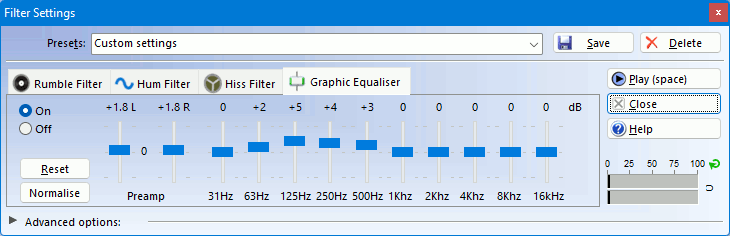
Use the graphic equaliser to, for example, boost the treble on recordings made from cassette tapes which can often sound rather dull. Changes are applied in real time so you can adjust the sound until you get the results you want.
The preamp setting can be used to boost quiet signals, but be careful not to set this too high - if the VU meters turn completely red while playing a loud section you need to turn this down. You can also use VinylStudio's Normalisation feature to set these automatically. To move a slider individually, hold down the shift key.
To normalise a recording, click Normalise. This displays a dialog to let you choose the desired final volume level and other options:
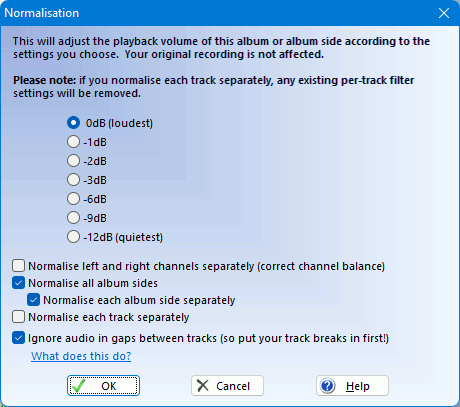
Like all the audio cleanup tools, VinylStudio's normalisation procedure is non-destructive - i.e. no changes are made to the recorded file. Instead, the results are applied when you burn CDs or save your tracks. You can also normalise albums in 'batch' mode in the Batch window.
Please note that, like all the filters, the results are not shown in the waveform display; if you want to see how it will look, save a copy of your recording (right click on the file and select Save a Copy). The effects of any filters in effect are included in VinylStudio's calculations when you run the normalisation procedure however, so do this after all other audio cleanup tasks have been completed.
If you wish to normalise all recorded sides for the album in a single operation, check Normalise all album sides before normalising. VinylStudio can then either normalise each side separately (the default), or adjust all sides by the same amount (which will be governed by the loudest album side). You can also elect to normalise each track separately.
If you have , you can use loudness normalisation, rather than normalising by peak amplitude. This uses the EBU R128 algorithm to estimate the loudness of the audio and applies the appropriate gain.
Please note that loudness normalisation can cause clipping. VinylStudio displays the peak amplitude after normalisation completes and if this is excessive, normalise again at a lower level.
If you have , you can turn on VinylStudio's 'smart normalisation' feature. This ignores audio in the gaps between tracks (as well as before the start of the first track and after the end of the last) and, in particular, can be used to prevent the sound of the needle drop and lift from affecting the results.
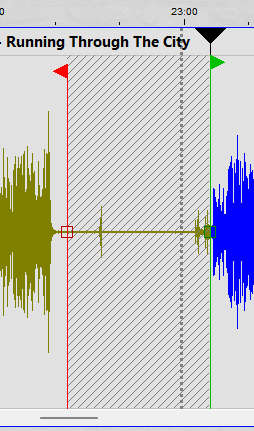
For this to work properly, you need to position the track break markers correctly before you perform the normalisation step. Specifically, make sure that you position the first green start-of-track marker past the initial needle drop, and the last red end-of-track marker before the final needle lift. You also need to elide the needle lift and subsequent drop between album sides, again by postioning the track break markers on either side appropriately. You can do this by ensuring that the red marker is positioned before the needle lift and then dragging the following green marker past the needle drop, like so:
Playing the audio as you work will help you get this right.
If you have , you can compress your recordings to level out the volume of your saved tracks. The compressor boosts quieter passages of audio to give your saved tracks a consistent volume level, and this can help match audio files acquired from other sources. Like all VinylStudio's audio cleanup tools the compressor is non-destructive, but please note that you might have to accept some clipping to get the playback level you want. Let your ears be the guide and adjust the settings to reduce the output level if necessary.
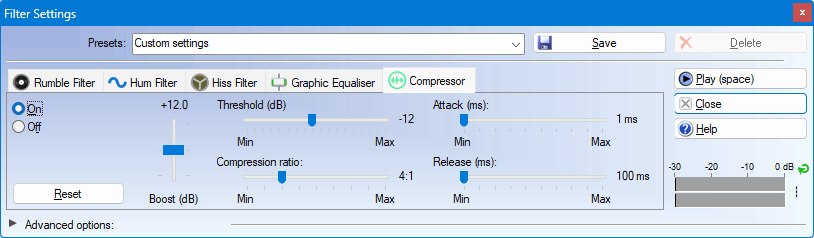
The controls work as follows:
There is a good explanation of how audio compressors work here:
https://www.musicguymixing.com/compressor-ratio-explained
You can save frequently used filter settings as a preset. To do this, adjust the filter settings as desired and then click Save. Presets are named and a few predefined ones (marked with an asterisk) are provided for the more common situations you might encounter. The '78 recorded at 45RPM' preset attempts to correct inaccuracies in equalisation caused by recording at the wrong speed, but vintage records use varying equalisation schemes anyway so trust your ears and be prepared to experiment.
To apply the same settings as you used previously, select Last settings used.
VinylStudio can apply any set of filters to any section of music within an LP side. You might want to boost the bass on a particular track, for example. To do something like this, click on Advanced options and then on the Add Filter button to add a new set of filters. This displays the following dialog:
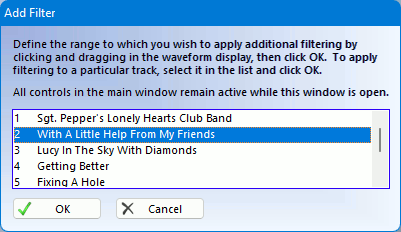
While this dialog is open, you can either define a selection by clicking and dragging in the waveform display or you can select a track from the list and click Select Track. Either way, the new set of filters will be applied to the range you specify.
After you close the Add Filter dialog, the Filter Settings dialog should look something like this:
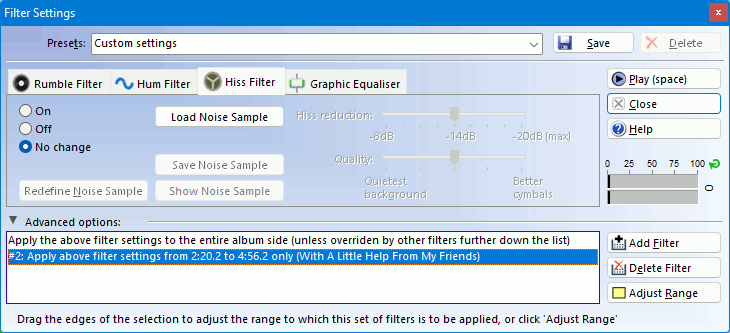
You will notice that a second entry has appeared in the list (#2) showing the section of music to which this set of filters is to be applied. Adding a new set of filters in this way allows any filter (hum, hiss, rumble and equaliser) to be adjusted in whatever way you choose for the section of music specified.
You can add as many sets of filters as you like in this way and for each type of filter you can say whether you want to turn it on, turn it off, or keep the existing settings (i.e. 'unchanged from the above'). This provides a lot of flexibility - more than you need probably - but it does let you say things like 'boost the treble on the entire recording except for tracks X, Y and Z'.
Note that filters don't 'add up' - that is to say, for example, adding a second hiss filter does not perform double the amount of filtering. Where the ranges of two or more filters overlap, the last one in the list takes precedence.